Bir önceki yazımızda örnek bir django api nasıl yazıldığı adım adım anlatılmıştır. Bu yazıda ise bir derin öğrenme modeli için gerekli olan bir resim/fotoğraf verisinin nasıl gönderildiği anlatılmıştır. Test olarak kullanılan örnek derin öğrenme modeli olan “ResNet50”, keras kütüphanesi içerisinde hazır olarak yer almaktadır. Bir önceki yazıda ayarlaması yapılan settings.py, urls.py ve views.py dosyaları içerisinden sadece views.py dosyası yeniden düzenlenecektir. views.py dosyasının son hali aşağıda verilmiştir.
views.py
# Create your views here.
from django.views.decorators.csrf import csrf_exempt
from django.http import HttpResponse

from keras.applications import ResNet50
from keras.preprocessing.image import img_to_array
from keras.applications import imagenet_utils
from PIL import Image
import numpy as np
import io

import json

def prepare_image(image, target):
    # if the image mode is not RGB, convert it
    if image.mode != "RGB":
        image = image.convert("RGB")

    # resize the input image and preprocess it
    image = image.resize(target)
    image = img_to_array(image)
    image = np.expand_dims(image, axis=0)
    image = imagenet_utils.preprocess_input(image)

    # return the processed image
    return image

@csrf_exempt
def genderSearch(request, search=None):
    # if request.method == 'POST':
    #     return HttpResponse(json.dumps({"success": True, "result": "POST"}),
    #                         content_type="application/json")
    # return HttpResponse(json.dumps({"success": False, "result": "GET"}),
    #                     content_type="application/json")

    data = {"success": False}
    if request.method == 'POST':
        if request.FILES["img_binarydata"]:
            try:
                # read the image in PIL format
                image = request.FILES["img_binarydata"].read()
                image = Image.open(io.BytesIO(image))

                # preprocess the image and prepare it for classification
                image = prepare_image(image, target=(224, 224))

                # classify the input image and then initialize the list
                # of predictions to return to the client
                model = ResNet50(weights="imagenet")
                preds = model.predict(image)
                results = imagenet_utils.decode_predictions(preds)
                data["predictions"] = []

                # loop over the results and add them to the list of
                # returned predictions
                for (imagenetID, label, prob) in results[0]:
                    r = {"label": label, "probability": float(prob)}
                    data["predictions"].append(r)
                data["success"] = True
            except:
                pass

    return HttpResponse(json.dumps({"success": True, "result": data}), content_type="application/json")
Sistem adres çubuğundan çağrıldığında aşağıdaki ekran görüntüsü elde edilecektir.
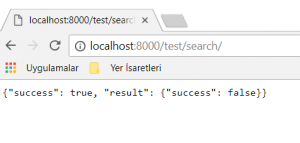
Yukarıdaki işlem bir “GET” işleminin çıktısıdır. Bir önceki yazıdaki gibi bir python script ile post istekleri göndermek istiyoruz. Bunun için hazırlanan örnek python dosyasının içeriği aşağıdaki gibidir.
requestApiImage.py
import requests
import os

# USAGE:  python simple_request.py
KERAS_REST_API_URL = "http://localhost:8000/test/search/?"

imagePath = os.path.join(os.getcwd(), "images")

for image_name in os.listdir(imagePath):
	IMAGE_PATH = os.path.join(imagePath, image_name) # image path

	# load the input image and construct the payload for the request
	image = open(IMAGE_PATH, "rb").read()
	# print(image)
	payload = {"img_binarydata": image}

	# submit the request
	r_person = requests.post(KERAS_REST_API_URL, files=payload)
	response_data = r_person.json()
	person = {"person": response_data["result"]}

	print(person)
Oluşturulan “requestApiImage.py” dosyası terminal ekranından “python requestApiImage.py” komutuyla çalıştırılır ve elde edilen sonuç ekranı aşağıda verildiği gibidir.

Kaynak kodumuzu github üzerinden paylaştık. Kaynak Kodun Linki: https://github.com/cilbetul/django-restful-api
KAYNAKLAR:
[1] https://blog.keras.io/building-a-simple-keras-deep-learning-rest-api.html?utm_content=buffer08c4c&utm_medium=social&utm_source=linkedin.com&utm_campaign=buffer
HAZIRLAYANLAR:
Semiha MAKİNİST, Betül ÇİL